Can Pool Leak Through Hydrostatic Valve? Detection & Repair

Hydrostatic valve causing pool water loss - is this possible?
Read full question
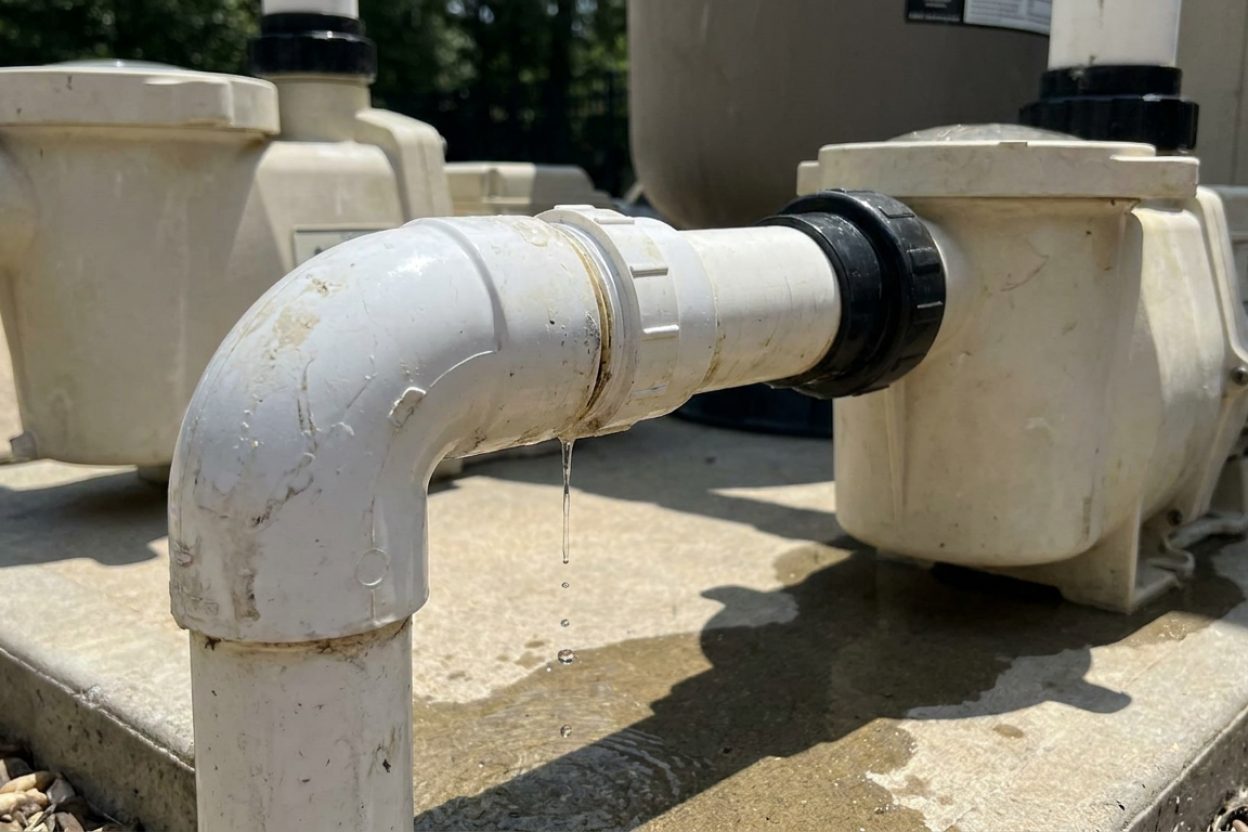
According to my pool's behavior, the water level started dropping steadily yesterday even though nobody's been swimming, and now I'm wondering if the hydrostatic valve is leaking. The water level drops consistently even when the pool isn't in use, and I've already ruled out obvious surface leaks around the skimmers, returns, and visible plumbing.
From my understanding, hydrostatic valves are designed to prevent the pool shell from floating during high groundwater conditions, but I'm wondering if they can work in reverse - allowing pool water to escape when groundwater levels are low or if the valve mechanism fails. The water loss seems to correlate with our recent dry spell, which has me questioning whether the valve could be stuck open or damaged.
Is it technically feasible for a hydrostatic valve to cause pool water leakage, and if so, what specific failure modes should I be looking for during inspection?
Quick Answer
Yes, a pool can leak through a hydrostatic valve when the valve becomes stuck open, damaged, or improperly sealed. This typically occurs when groundwater pressure drops or the valve mechanism fails, allowing pool water to escape into the ground.
Step-by-Step Detection Process
- Locate your hydrostatic valves - These are typically found in the main drain at the deep end, and sometimes as additional plugs in the pool floor. They appear as small circular covers, usually white or gray, about 3-4 inches in diameter with a spring-loaded mechanism underneath.
- Perform the bucket test first - Before suspecting the hydrostatic valve, confirm you have a leak by placing a bucket filled with pool water on the pool step. Mark both water levels and check after 24 hours. If the pool loses more water than the bucket, you have a leak.
- Check valve operation underwater - Put on goggles and dive down to examine the hydrostatic valve. Look for visible water movement, bubbles, or debris around the valve seat that might prevent proper closure.
- Visual inspection of valve - Examine the valve cover for obvious damage, corrosion, or debris. Look for signs that the valve is not seating properly, such as visible gaps or foreign objects preventing closure. Avoid manually pressing the valve as this can damage the mechanism or give false readings.
- Perform the dye test - With the pool pump off, squeeze food coloring or leak detection dye near the hydrostatic valve. If the dye gets sucked toward or under the valve, you've confirmed a leak.
- Monitor groundwater conditions - Check recent weather patterns. Heavy rains can raise groundwater levels and cause valves to open, while drought conditions or nearby construction dewatering can lower groundwater pressure, potentially causing valves to malfunction.
Understanding Hydrostatic Valve Function
Hydrostatic relief valves serve a critical purpose in pool construction. They prevent the pool shell from "popping" out of the ground when groundwater pressure exceeds the weight of water in the pool. However, this protective mechanism can become a source of leaks when:
- The valve spring mechanism weakens over time
- Debris prevents the valve from seating properly
- The rubber gasket or seal deteriorates
- Groundwater pressure fluctuations cause frequent opening and closing, wearing out components
- Chemical imbalances corrode the valve components
Step-by-Step Repair Process
- Drain the pool partially - Lower water level to below the hydrostatic valve location. For main drain valves, the standard fix is to have a qualified diver replace the valve underwater without draining the pool; full draining should be avoided where possible and only done by professionals due to pop-out risk.
- Remove the valve assembly - Unscrew the valve cover (usually counter-clockwise). Some valves have a locking mechanism that requires a special tool or needle-nose pliers to remove.
- Inspect all components - Examine the spring, valve seat, gasket, and cover for damage, corrosion, or debris. Look for cracks in the plastic components or rust on metal springs.
- Clean the valve seat thoroughly - Use a soft brush or cloth to remove algae, calcium buildup, or debris from the valve seat and surrounding area. Ensure the surface is completely smooth and clean.
- Replace worn components - Install new gaskets, springs, or the entire valve assembly if components are damaged. Always use manufacturer-approved replacement parts to ensure proper fit and function.
- Apply thread sealant - Use pool-grade thread sealant or thread tape around the valve threads to ensure a watertight seal. Avoid petroleum-based products that can damage pool surfaces.
- Reinstall and test - Thread the valve assembly back into place, ensuring it's properly seated. Tighten to manufacturer's torque specifications; if unavailable, hand-tighten until snug plus 1/4 turn, being careful not to over-tighten and crack the valve body.
- Refill and monitor - Refill the pool and monitor water levels closely for 48-72 hours to confirm the repair was successful.
Prevention and Maintenance
Regular maintenance can prevent hydrostatic valve leaks:
- Inspect valves every 6 months during routine pool maintenance
- Keep pool chemistry balanced to prevent corrosion (pH 7.4-7.6, total alkalinity 80-120 ppm)
- Clear debris from valve areas during regular cleaning
- Monitor local groundwater conditions and construction activities
When to Call a Professional
Important: If your hydrostatic valve is located in the main drain and requires complete pool draining, always consult a professional. Draining a pool in high groundwater conditions or during certain weather can cause the pool to crack or "pop" out of the ground, resulting in tens of thousands of dollars in damage.
Professional help is also recommended if you discover multiple valve leaks, structural cracks around valve areas, or if DIY repairs don't solve the problem. Pool structural issues related to hydrostatic pressure require expertise to diagnose and repair safely.
 UKNOW Anti-Fog Chemical Splash Safety Goggles
Sealed splash goggles for handling muriatic acid and chlorine. View on Amazon →
UKNOW Anti-Fog Chemical Splash Safety Goggles
Sealed splash goggles for handling muriatic acid and chlorine. View on Amazon →
 Poolvio 20" 2-in-1 Pool Brush Head (Walls & Floor)
Sturdy 20-inch brush head that clips onto any standard telescopic pole. View on Amazon →
Poolvio 20" 2-in-1 Pool Brush Head (Walls & Floor)
Sturdy 20-inch brush head that clips onto any standard telescopic pole. View on Amazon →
 Blue Monster PTFE Thread Seal Tape (1/2 in × 1429 in)
Heavy-duty thread tape for leak-free pool plumbing fittings — stops suction-side air leaks. View on Amazon →
Blue Monster PTFE Thread Seal Tape (1/2 in × 1429 in)
Heavy-duty thread tape for leak-free pool plumbing fittings — stops suction-side air leaks. View on Amazon →
 Aladdin Magic Lube II — Pool O-Ring & Gasket Silicone Lubricant (1 oz)
Waterproof silicone lube that keeps pump-lid and valve O-rings sealed and pliable — the usual cure for lost prime. View on Amazon →
Aladdin Magic Lube II — Pool O-Ring & Gasket Silicone Lubricant (1 oz)
Waterproof silicone lube that keeps pump-lid and valve O-rings sealed and pliable — the usual cure for lost prime. View on Amazon →
Still need help? Ask a Pool & Spa Expert AD
Get a personalized answer from PoolGuy810 — 30 years owning a pool and spa repair company. Describe your issue and get step-by-step help.
Need More Help?
Try our free pool calculators and tools to help diagnose and fix your pool problems.
Browse Pool ToolsSLAM calculator, pH calculator, salt dosing & more